The Tour of Heroes tutorial takes us through the steps of creating an Angular application in TypeScript. You can start the Tour of Heroes tutorial here.

We tackle new technologies often, probably more often that we prefer. We are pressured to get up to speed on these technologies as quickly as possible. Often the technology fights back at us with awful or no documentation. Sometimes the documentation is wonderful for APIs but no so great at showing us how to think about building an app. I have a passion for Angular 2 and JavaScript so when the Angular team and Ward Bell were designing the docs at http://angular.io and they approached me about helping build a tutorial, I viewed this as an opportunity to be part of the solution for Angular 2.
In fact, Ward has made sure that all of the dev guide chapters follow a story, not just the tutorial. Each part of the guide is motivated by something real we all face.
The Story
The story for this tutorial is not about the tech, it’s about the motivation for using the tech. When we are looking for an API or every possible use of a feature, we look elsewhere in the docs. If we want to know how and why each feature helps drive real solutions, the Tour of Heroes is that place. Each chapter lays out a set of requirements and walks us through the decision process on how to tackle it. Often the process is not the most efficient way to tackle it. Why? Because when we get started we often do not know the most efficient way to tackle the problem. We’re learning!
Imagine watching Star Wars and all we see is Anakin being born, the next scene he kills Obi Wan, and then he dies saving his son. Done. That’s not a story. Why did he turn evil? How did he get saved? What happened along the way that motivated this story?
When we develop web applications we need to understand the motivation behind the requirements and the framework so we know how to drive to the solution.
The tour takes us through decisions and rewards us with the results with live examples and feedback. It also shines a light on mistakes that we may make when we leave the tour of heroes, explaining why we may tread on these and how we can avoid them in the future. It’s a story.
###Learning The tutorial is a 5 part (so far) series. We release a new part as we progress. We start small and we extract pieces as we are motivated by requirements. Each story has a live sample you can run in plunker. Each story has a before and after picture of the files and code we create.

The storyline currently has an introduction plus 5 chapters:
###Introduction Our grand plan is to build an app to help a staffing agency manage its stable of heroes. We’ll learn enough core Angular to get started and gain confidence that Angular can do whatever we need it to do. We’ll build this Tour of Heroes together, step by step. We’ll motivate each step with a requirement that we’ve met in countless applications. Everything has a reason.
###The Hero Editor Our story starts here, following the 5 minute QuickStart. We need to display a list of our heroes. Along the way we learn the basics of components and displaying data in templates.
###Master Detail Our story needs more heroes. We’ll expand our Tour of Heroes app to display a list of heroes, allow the user to select a hero, and display the hero’s details.
###Multiple Components Our app is growing. Use cases are flowing in for reusing components, passing data to components, and creating more reusable assets. Let’s separate the heroes list from the hero details and make the details component reusable.
###Services Multiple components will need access to hero data and we don’t want to copy and paste the same code over and over. Instead, we’ll create a single reusable data service and learn to inject it in the components that need it. Refactoring data access to a separate service keeps the component lean and focused on supporting the view. It also makes it easier to unit test the component with a mock service.
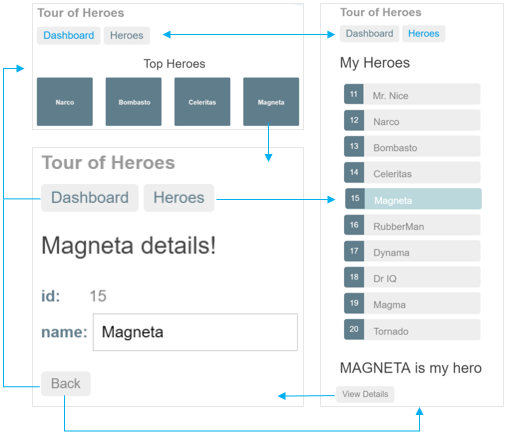
###Routing We want to create a dashboard, add menu links that route between the views, and format data in a template. As our app evolves, we’ll learn how to add navigation and we’ll design it to make it easier to grow and maintain.


