This week I decided to experiment with a few webcam features and put together an application that activates a webcam, allows the user to take snapshots, and save the snapshots to PNG files. I like when demos use MVVM out of the box instead of just throwing all of the code in a single code behind, so one of my goals was to make a passing effort to break the code out and use MVVM practices.
The first thing I did was grab Tim Heuer’s webcam sample which already handles activating the webcam. Tim did a great job with this, so instead of reinventing the wheel for this demo I decided to start with his code and add my requirements. First I wanted to hit the UI, so I created a new project, and copied the UI from Tim then took out what I did not need and add what I did need. Of course I did all of this in Expression Blend. Cider is great, but I’m faster in Blend by far. The UI is very simple, so this was a minimal effort. Here is the basic UI:
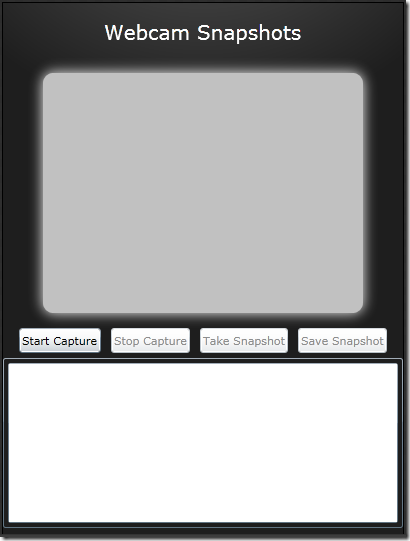
This sample application uses the .NET ImageTools library. You can grab the source or binaries for it on codeplex here.
Files
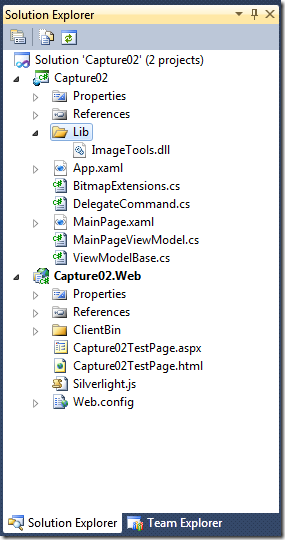
There are only a few files in this project, as shown in the image below.
- MainPage.xaml
- View
- MainPageViewModel
- ViewModel
- DelegateCommand
- Generic class to handle the commanding features
- ViewModelBase
- Contains basic VM features, like INotifyPropertyChanged implementation
- BitmapExtensions
- Contains some simplification code to save to PNG from a WriteableBitmap
- This uses the ImageTools.dll from codeplex
ViewModel
The demo uses a View named MainPage.xaml as shown in the above screen capture. The View is bound to an instance of a ViewModel named MainPageViewModel. The VM contains several properties that the View uses in its bnidings:
- ICommand StartCaptureCommand
- ICommand StopCaptureCommand
- ICommand TakeSnapshotCommand
- ICommand SaveSnapshotCommand
- ObservableCollection<WriteableBitmap> Images
- VideoBrush VideoBrush
- WriteableBitmap SelectedSnapshot
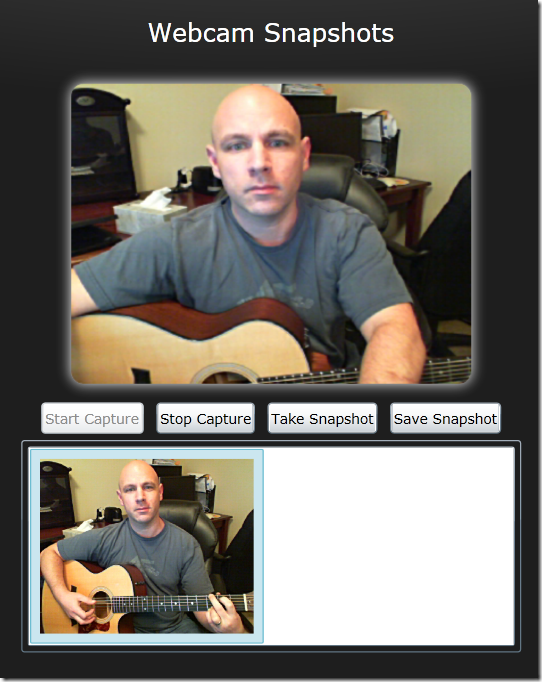
The commands handle the interaction with the capture process and saving to the PNG file. We’ll look at those closer in a moment. The Images collection contains a series of WriteableBitmap instances that are gathered from the capture process. When someone clicks the Take Snapshot button, the WriteableBitmap is retrieved from the capture stream and added to the Images collection.
The VideoBrush property exposes the video stream to the View, through bindings. I am not convinced this is the ideal way to go as I generally do not like to expose a brush from a VM since a brush is View specific. One alternative is to expose the stream in another fashion and use a converter (yuk). Or another option is to perform the video capture in the View. I don;t have a problem with this being done in the View, but I wanted to show how this could work with MVVM. In this case I feel it’s acceptable either way.
The SelectedSnapshot property represents the WriteableBitmap that the user selects in the UI. When the user clicks the Save Snapshot button, this property is checked and saved to a PNG file.
CaptureSource
The code to activate the webcam and begin capturing the video stream is straightforward. First I created a private property named CapSource in my ViewModel. The CapSource is set in the constructor of the VM, with the video device set to the default video capture device as shown below:
1: CapSource = new CaptureSource
2: {
3: VideoCaptureDevice = CaptureDeviceConfiguration.GetDefaultVideoCaptureDevice()
4: };
Commanding
I hooked a Command up to the “Start Capture” button using the new commanding features in Silverlight 4. The XAML to do this is very simple … you just bind to the Command which is in the ViewModel, in this case.
1: <StackPanel Orientation="Horizontal" HorizontalAlignment="Center">
2: <Button Margin="5" Content="Start Capture" Height="25" Command="{Binding StartCaptureCommand}" />
3: <Button Margin="5" Content="Stop Capture" Height="25" Command="{Binding StopCaptureCommand}" />
4: <Button Margin="5" Content="Take Snapshot" Height="25" Command="{Binding TakeSnapshotCommand}" />
5: <Button Margin="5" Content="Save Snapshot" Height="25" Command="{Binding SaveSnapshotCommand}"/>
6: </StackPanel>
The commands are set up in the constructor of the VM. I assigned each of the commands an action (for performing the action when the button is clicked) and a function (for determining if the button should be enabled or not). In Silverlight 4 we have the ICommand interface and now the new binding properties: Command and CommandProperty. We still need a commanding implementation. You can write one for each command (yuk), create some sort of command manager, or use an implementation of the DelegateCommand class. I chose the latter in this case because it is simple and still abstracts the boring parts of the commands for reuse. (You can check out the DelegateCommand class in the source code for this sample project.)
1: StartCaptureCommand = new DelegateCommand(StartCapture, CanStartCapture);
2: StopCaptureCommand = new DelegateCommand(StopCapture, CanStopCapture);
3: TakeSnapshotCommand = new DelegateCommand(TakeSnapshot, CanTakeSnapshot);
4: SaveSnapshotCommand = new DelegateCommand(SaveSnapshot, CanSaveSnapshot);
Capture Video
When the user clicks the button, the command fires in the VM. The StartCapture method checks the state of the capture and stops it if it is already in process. Then the VideoBrush is set to the capture source.
1: private void StartCapture(object obj)
2: {
3: if (CapSource != null)
4: {
5: if (CapSource.State != CaptureState.Stopped)
6: {
7: CapSource.Stop(); // stop whatever device may be capturing
8: }
9:
10: // create the brush
11: VideoBrush.SetSource(CapSource);
12:
13: // request user permission and display the capture
14: if (CaptureDeviceConfiguration.AllowedDeviceAccess || CaptureDeviceConfiguration.RequestDeviceAccess())
15: {
16: CapSource.Start();
17: }
18: }
19: RefreshCommandStates();
20: }
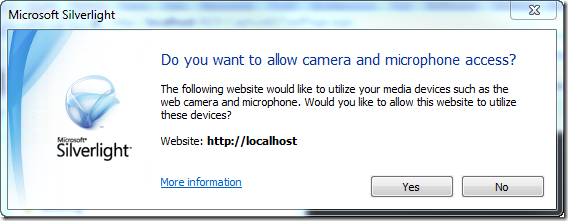
The “if” statement checks if the user has already allowed access to the device by checking CaptureDeviceConfiguration.AllowedDeviceAccess. If not, the user will be prompted to allow access to the camera and microphone using the CaptureDeviceConfiguration.RequestDeviceAccess method (see below). Then the capture process is started.
Finally, the RefreshCommandStates method is fired, which indirectly (through INPC events and bindings) enables or disables the buttons appropriately.
Take a Snapshot from the Video
When the capture process has started and a user clicks the Take Snapshot button, the appropriate command is invoked in the VM and the capture source’s AsyncCaptureImage method is invoked. I used the Dispatcher to make sure I operated on the UI thread because I wanted to not only grab the bitmap but I also want to update the View’s state. Again, not sure I like this in a VM, but I’ll take some liberties here and apply the ForemostItHasToWork pattern.
1: private void TakeSnapshot(object obj)
2: {
3: if (CapSource != null && CapSource.State == CaptureState.Started)
4: {
5: CapSource.AsyncCaptureImage((bitmap) =>
6: {
7: App.Current.Resources.Dispatcher.BeginInvoke(() =>
8: {
9: Images.Add(bitmap);
10: SelectedSnapshot = bitmap;
11: RefreshCommandStates();
12: });
13: });
14: }
15: }
Save to PNG
Once the user has selected an image in the list, the Save Snapshot button is enabled. When the user clicks this button the SaveSnapshotCommand in the VM retrieves the WriteableBitmap from the SelectedSnapshot property (which is bound to the SelectedItem of the ListBox). Then an extension method I created on the WriteableBitmap saves the snapshot to a PNG file.
1: private void SaveSnapshot(object obj)
2: {
3: var bitmap = SelectedSnapshot;
4: if (bitmap != null)
5: {
6: bitmap.SaveToPNG();
7: }
8: RefreshCommandStates();
9: }
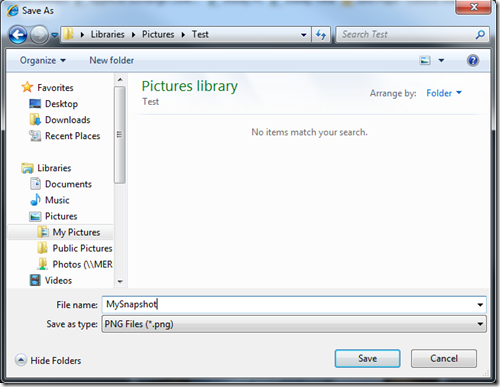
This prompts the user for the file name and saves the png.
A Word About PNG Conversion
Once you have a WriteableBitmap (or an image for that matter) you can convert it to a PNG file. To do this it makes sense to use one of the existing libraries of conversion tools. One such tool was written by Joe Stegman and can be found here. Joe’s PNG converter is straightforward and simply requires that you add 2 classes to your project. Another option is to use one of the tools on codeplex. A popular choice seems to be the .NET ImageTools library (thanks to several people on Twitter for alerting me to this). This library can be referenced and used pretty easily. It does more than just conversion to a PNG, but it handles what I need with relative ease. For all it does, I could not find a simple method that accepted a WriteableBitmap and outputted a PNG (or any file format). So I quickly wrote up quick extension method that handles this for me. Since this was my first glance at this open source API, it is likely that there is an easier/better way to convert from a WriteableBitmap to a PNG using ImageTools, so if you find one please leave a comment and I will update the code. It does the job nicely though and handles compression of the PNG.
1: public static void SaveToPNG(this WriteableBitmap bitmap)
2: {
3: if (bitmap != null)
4: {
5: SaveFileDialog sfd = new SaveFileDialog
6: {
7: Filter = "PNG Files (*.png)|*.png|All Files (*.*)|*.*",
8: DefaultExt = ".png",
9: FilterIndex = 1
10: };
11:
12: if ((bool)sfd.ShowDialog())
13: {
14: var img = bitmap.ToImage();
15: var encoder = new PngEncoder();
16: using (Stream stream = sfd.OpenFile())
17: {
18: encoder.Encode(img, stream);
19: stream.Close();
20: }
21: }
22: }
23: }
From Here
The webcam and microphone features in Silverlight 4 are fun to work with and can be useful to grab images and save them (or email them, or stream them, etc). I had a good time putting this together and learned about the PNG conversion options along the way.
You can download the source code here for the entire sample application. Enjoy!
UPDATE (Jan 03,2010): Laurent Bugnion alerted me that there indeed is a ToImage method in the ImageTools library. The trick is to make sure you download the right link from the ImageTools codeplex site. The first link just gives you the basics, the second link gives you all the dll’s. Once I downloaded that second link I was able to add references to a few assemblies in the ImageTools library that cleaned out some of my code for my extension method. The net result is that my extension method is considerably shorter and clearer. I just updated the extension method in the above code window and in the downloadable code. Feel free to grab the latest and run with it!


