Often I like to test my web apps in a real website. For me, Windows Azure is ideally suited for this. I can spin up a site as needed, publish my demo, test it on a variety of devices, and tear it down when I am done. the best part is that it only takes a few moments to learn how to do this. What do you need? Just install Visual Studio 2012 and open a Windows Azure account and you are all set. In this post I’ll tell you how to set up an Azure website, how to publish to Azure, and offer several tips in case you run into issues along the way.
At a Glance
In the Windows Azure Portal
- Sign up for an account with Windows Azure
- Create a New Web Site
- Download the publishing profile file
In Visual Studio 2012
- Ensure all NuGet packages are installed
- Build your solution
- Publish your solution
Create a Windows Azure Web Site
The first step is to sign up and create an account with Windows Azure. Depending on what programs you are participating in you may qualify for different options. I’ll assume that you have signed up or can figure that out on your own. The next step is to create a web site in Azure. I don’t require a lot of resources for testing my apps, so when I create web sites for this purpose I just choose the smallest/cheapest options available. That is what I will go through here.
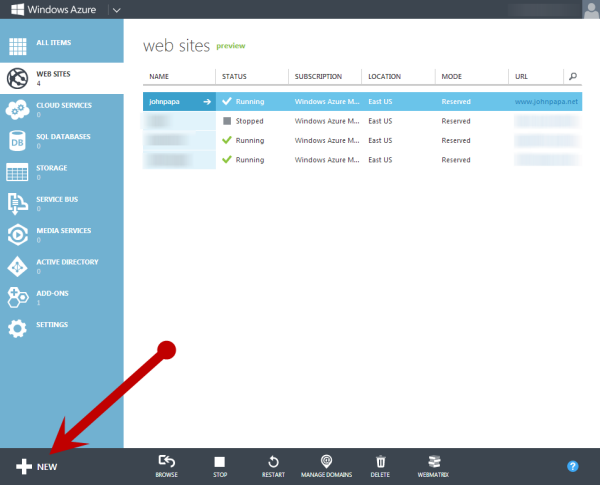
Go to your Windows Azure portal and select the plus sign in the bottom left hand corner.

Then choose the Web Site option, and the Quick Create option. From here, it will ask you to type in the url you want. It automatically places you in the azurewebsites.net domain. (You can reconfigure this later if you want to use a domain that you own.) I typed in papademonstration so I get papademonstration.azurewebsites.net. I trust you will pick something far shorter :)
In my experience, it will take anywhere from 30 seconds to a few minutes to spin up the new site. When using the Quick Create you get a very simple setup. You can configure your domain name, whether you want to share a virtual server or get a reserved server, how many cores, instances, memory and so on. For this post, I’m just focusing on the simple route where you want to spin up a site so you can test your app, and for that the Quick Create is all I’ll need.
Publishing Profile
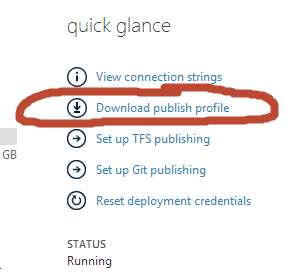
Next you are going to want to know how to connect Visual Studio to Azure so you can publish your project to it. For this you will need the publishing profile. Once the web site’s status says running instead of creating ..., click on the name of the web site in the Azure portal. You will then see the dashboard for that new site. On the right you will see a section titled quick glance. From here you can click the link to download publish profile.
This will download the profile to your computer. It is a text file and if you open it you can see it contains sensitive information about connecting to your site.
Publish in Visual Studio
Next, go to Visual Studio 2012 and open your project. Be sure that all of the NuGet packages are installed properly and that you have just re-built the solution successfully.
Tip: I have found that the publishing process goes much smoother when you build immediately prior to publishing.
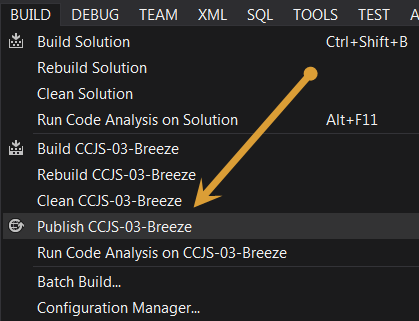
While the project is selected, go to the Visual Studio 2012 menu and select Build and Publish.
You will see a dialog that allows you to import a profile. Click the import button and locate the publish profile you recently downloaded for your new web site. This is how you tell Visual Studio 2012 where to send your code. Then click the next button. I recommend clicking the Validation Connection button on the Connection dialog, just to verify it can communicate with the web site. Then click the next button and you will see the settings dialog, where you can choose which configuration to publish (release, debug, etc). Then click the next button again and yu will see the preview dialog. I recommend always coming to this dialog and click the Start Preview button. Sometime you will see “Preview Failed (click here for details)”. Often the error message it reveals is obtuse, so I simply close this, save any changes to the profile, clean and rebuild the solution and try again. It often works after that.
Tip: Don't be scared if you see a message that says "Web.config not found". I think there must be a random strange error message generator that kicks in when the preview fails. I just ignore those messages as they rarely make sense and rebuild the solution. The messages might as well say "pigs are flying out your window" for all the help they are.
Once you get a clean preview, you can click the publish button. All files are then sent up to the web site and it will open a browser and hopefully you will see your app!
Avoiding Gremlins
If you are like me, then you likely won’t hit the happy path each time your publish. It’s common for me to forget something and have to try again. Here are some more tips I have learned along the way that may help you if you read this far. If you didn’t, well, then, I might as well do a dance since you aren’t reading this far anyway. :)
Rebuild
Always rebuild right before you publish. Yes, i said it a few times in here, but it’s very important to staving off gremlins.
Include Files
Remember to include files in your Visual Studio 2012 project that you want published. If you don’t you can always FTP them later.
Restart Web Site
If you have problems publishing to your web site, go to the portal and restart the site. It takes about 5 seconds for me.
FTP
If you have problems publishing on top of existing files, consider FTP’ing to your site and clearing it manually. I had to do this once or twice myself.
Miss a File?
If a file did not get sent up to your web site, you can always FTP it.
keep It Secret, Keep it Safe
Your FTP credentials are in the publish profile (you may want to make sure you protect that file).
SQL Server CE
If you publish a SQL Server CE file (an *.sdf) for use with EntityFramework, make sure you have the EntityFramework.SqlServerCompact NuGet package installed before you publish. Otherwise you may see errors trying to connect to the database.
What's the Real Error?
If you see obtuse error messages, turn off customErrors in web.config to reveal the real error message (then be sure to undo this later).


