If you’ve decided to immerse yourself in modern web development with JavaScript libraries such as AngularJS, Bootstrap, React, or Knockout then you’ve undoubtedly heard of Bower, NPM, Grunt, Gulp, and Node somewhere along the way. If you’ve been meaning to learn them, then this post should help you get started.
There are plenty of articles on the topic but I wanted to take a different approach to talk less about what node does and instead show you. So let’s use node to get an app up and running and then try it in Visual Studio.
The Landscape
Many developers have lived in their own stack for a long time, and very successfully I might add. Lately there have been an increasing number of efforts of cross-pollination where it is common to see someone working with mixed toolset. For example, a JavaScript front end with a .NET Web API talking to Java back end services; or a JavaScript front end running on a node server in Microsoft Azure. The emphasis is now on the right tool for the job.
So where do we fit in? Perhaps you are a .NET and C# developer familiar with the Microsoft stack and Visual Studio tooling. Or perhaps you are a Java developer familiar with IntelliJ or Eclipse. Microsoft recognizes this shift and has made the move to open source ASP.NET and even .NET itself and move them towards being cross platform. But how do you leap into the cross platform world? Cloud is a great start, using tools like Microsoft Azure. Another great way is to learn JavaScript.
![]()
Learned Angular, Now What?
JavaScript seems to be permeating everywhere. If you are creating a web front end, chances are you’ve started exploring a framework like Angular. In fact a great way to slide yourself into the JavaScript world is to learn a front end framework like Angular and stick with your back end of choice, like .NET. I call this minimizing the concept count. By learning 1 item and keeping the rest the same familiar stack you know, you limit the moving parts to learn. However, it doesn’t mean you shouldn’t learn more concepts, it just means take it slowly.
Once front end developers get acquainted with Angular using .NET or Java as a server they start hearing more about tools like Node, Grunt, Gulp, Bower, and NPM. Uh oh, the concept count just went up! We can ignore these concepts and stick with things we know, but there is a reason they are so popular. Learning them should be a priority, if only to understand why they are considered essentials of the JavaScript development community.
Why Bother with Node?
Node is a platform, and you’ve already got one of those with .NET or Java. So if it ain’t broke, right? Well, let’s assume that we stick with the back end in .NET, is there still a place for node in your development toolbox? Yes, there is. Let me be absolutely clear on this: learning node may be the best thing you do all year for your career.
Why? Because the package managers, tools, and and build automation are free, fantastic, fast, and efficient.
So what? You’ve got build tools in ASP.NET now. But consider that the Microsoft teams have begun embracing the concept that if the community has already chosen an awesome tool, they will hook into it from Visual Studio and their stacks. Point in case is node with grunt or gulp … or bower and npm … all of these are now accessible directly from Visual Studio as first class citizens.
Yes, node is a platform and you can run a web server or web API’s off of it. But let’s put that aside, and believe me when I tell you that the npm, bower, gulp and grunt are more than enough reason to give node a shot, regardless of your back end stack.
You'll likely want to run these commands a command window that has administrative permissions in Windows.
Node and NPM on Windows
So let’s take node for a whirl. I’ll assume you already have Visual Studio, but if you do not then I suggest you download the free Visual Studio Community Edition. While you can download node directly and install it, you still need to set up your paths. Installing node on Windows is simplest using Chocolatey. You can install Chocolatey by pasting this command into a Windows command prompt (make sure there are no line breaks as it should all be on a single line):
@powershell -NoProfile -ExecutionPolicy unrestricted -Command “iex ((new-object net.webclient).DownloadString(‘https://chocolatey.org/install.ps1’))” && SET PATH=%PATH%;%ALLUSERSPROFILE%\chocolatey\bin
Chocolatey makes it easy to install node. Simply go to a command prompt and type the following command
choco install nodejs
This will also install npm. You may see some warnings, don’t worry about these.
Let’s make sure node worked by typing node -v into the command window. This should display the current version of node that you just installed (current version when I wrote this is 0.10.33).
NuGet, NPM and Bower
Now that you have node, you can go get some of the essential packages for it. The first 2 are bower and npm. npm already is installed with node, so you have that. Wait … what is npm? If you are familiar with NuGet then you can think of npm as NuGet for node modules. You use npm to install packages to build apps and solve problems. Generally, npm is used for server side node packages (e.g. lodash, gulp, grunt, yeoman), but lately it is also becoming more popular for client side packages too (angular, bootstrap, knockout). Bower is the more popular client side package manager … so think of it as your NuGet for client packages (like angular).
OK, that’ a lot of terms … so the simple way to think about this is that you use npm to install server packages and bower to install client packages.
Where does that leave NuGet? You can still use it for these, but it is more ideally suited for .NET libraries. There are packages for angular, for example, in NuGet. In fact, I co-maintain the Angular NuGet packages with Scott Hanselman. But when I need to install client libraries into any project type, I use bower. Right tool for the right job. NuGet for .NET libraries, bower and npm for JavaScript libraries.
Installing Bower
Let’s go get bower using npm. Bower is a client package manager, but before we can use it we need to get bower first. And bower runs on a machine to go get those client packages. So how do we install it? Using npm, like this:
npm install bower -g
This command tells npm to install bower globally. You can install a package globally or locally. Global packages are accessible on your machine from anywhere in the path, and you only have 1 global version of that package. This is ideal for things like bower which you want to use in many projects. Local packages are what your specific project needs. We’ll look at these more later, but for now know that bower is installed globally.
To prove this, move to any folder and type the following command to show the version
bower -v
What's Installed Globally?
One way to see what packages are installed globally is to run the command
npm list -g --depth=0
This lists all global packages. The --depth flag tells npm how many dependencies to show. Setting it to 0 says we just want to know the root packages, not everything they depend on. This should be a short list right now, including npm and bower.

Gulp and Grunt
Somewhere along the way you’ll want to learn more about gulp or grunt, two amazingly helpful JavaScript build automation tools. For now, let’s install them both globally, because when we do want to use them we’ll want them available everywhere.
npm install -g gulp grunt-cli
Notice you can install them both globally using npm on a single line. We’ll come back to these shortly, and I’ll hit gulp in more depth in a future post. For now just know that you made both grunt and gulp available via the command line interface (CLI).
Learn more about gulp in my course on using gulp for JavaScript build automation for Pluralsight, due out in early 2015.
Yo HotTowel !
It’s always fun to see some visual results. So let’s install yeoman (aka yo), a global npm package that helps generate apps. Let’s install yeoman globally by typing this command:
npm install -g yo
yo stands for Yeoman. Let’s then run yo -v just to verify that it is installed. The first time you will see some text welcoming you to yeoman. After that you just see the version.
Once installed, we can take advantage of some yeoman generators. Let’s install HotTowel using this command:
npm install -g generator-hottowel
Now we have a generator that will scaffold an entire Angular app out of the box for us. So what do we do with it? Let’s take it out for a spin by creating a new folder for a new project called myapp and changing directory to that folder.
mkdir myapp
Then go to that folder
cd myapp
Now let’s run the generator in this folder to create the app by typing:
yo hottowel helloWorld
You should see a lot of messages telling you what it created. This HotTowel generator creates an Angular app running on a node server, but there are generators for many types of projects. Some generators will prompt you with many options, too.
Before we run the app, make sure you have run all of the commands. If you have not, here is a quick list:
npm install -g bower grunt-cli gulp yo
npm install -g generator-hottowel
mkdir myapp
cd myapp
yo hottowel helloWorld
Now run the app by typing the following command:
gulp serve-dev --sync
If you followed all of the commands, you should see your browser open and navigate to the HotTowel app!
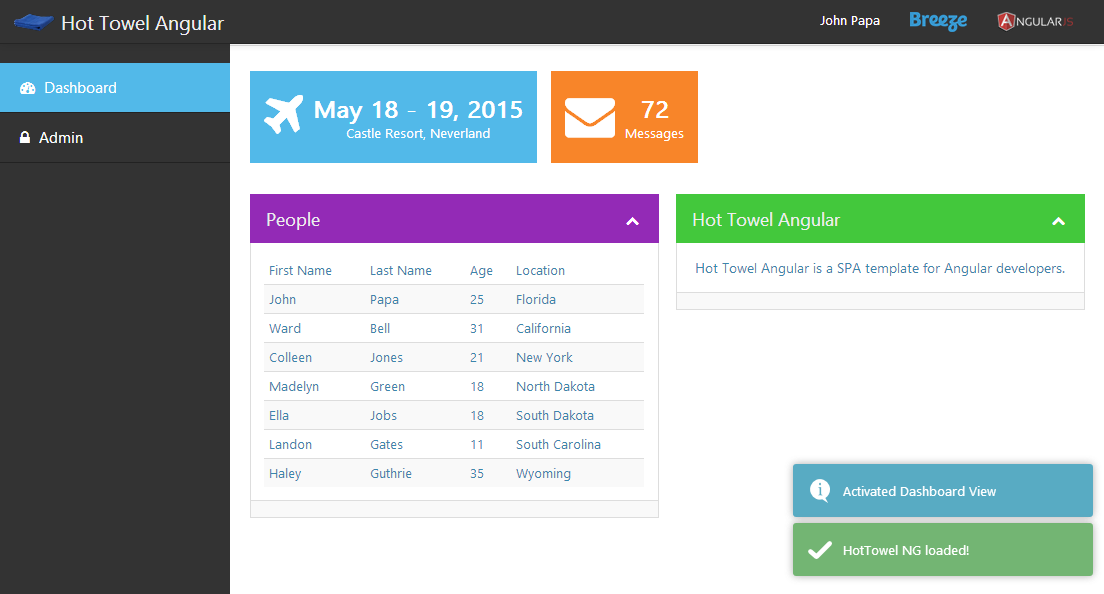
Now kill the server by going to your command prompt and hitting CTRL-C twice.
I'll explore the HotTowel app and what is included in a future post.
Code, Run, Code, Run, and Fast!
Now open up the code in the myapp folder in notepad, Sublime Text, or even Visual Studio. Make a change to the dashboard.controller.js file in the folder src/client/app/dashboard/ and notice how the browser refreshes with the changes.
Change the node server code in src/server/app.js and save the changes and you’ll see the server restarts (notice the command window) and the browser then refreshes with the changes.
This happens using any editor, so pick your favorite!
Optimized Code
You installed node, npm, bower, yeoman, gulp and grunt to help use kick start some JavaScript build automation. We now have what we need to make our lives easier in JavaScript.
How did that one command gulp serve-dev --sync know what client code to run and to open the browser? And where is the server it created? The hottowel yo generator defined a series of package manifests that contain a list of npm and bower packages, and then it installed them for you. Think of this as NuGet package restore but for npm and bower. If you ever need to run them manually you simply type the following commands to install the packages locally:
npm install
bower install
Then you used gulp to run the code, fire up the server, and the launch the app in the browser. Gulp automated that process for us.
OK, so if you are not impressed yet, think about how much effort goes into minifying JavaScript, concatenating it, compressing images, handling angular template caching, angular dependency injection safe annotations, file revisions, creating a simple index.html, running unit tests, linting your code, and more. Yeah, gulp can do that. Run this command:
gulp build
This will perform those and many more actions.
You may see an error about gulp-notify. Ignore that for now, it won't hurt anything and I will be fixing it in HotTowel soon.
Now run this command to see the optimized and built code:
gulp serve-build --sync
When it opens in your browser, open the developer tools and go to the network tab. Then refresh the page and check out the number of scripts loaded. Notice it is all optimized into 2 scripts! You’ll also see a 3rs script for browser-sync, I’ll get into that more when I dive into HotTowel in a future post.
Enter Visual Studio
You just saw that you can do all of this from a command line. And frankly, there is a lot of power and efficiency to be gained by doing it from there. But an IDE like Visual Studio has a ton of value too, so let’s explore how these 2 worlds can come together using the new tooling Microsoft has been creating.
Once you install Visual Studio 2013 with the latest Update (or Visual Studio 2015 coming as announced) you need to install the Task Runner Explorer extension. VS Update 4 can be downloaded here.
Open Visual Studio and choose File and then Open Web Site. Then select the myapp folder. This will open the HotTowel project you just generated using yo. Now right click on the gulpfile.js in Solution Explorer and select > Task Runner Explorer.
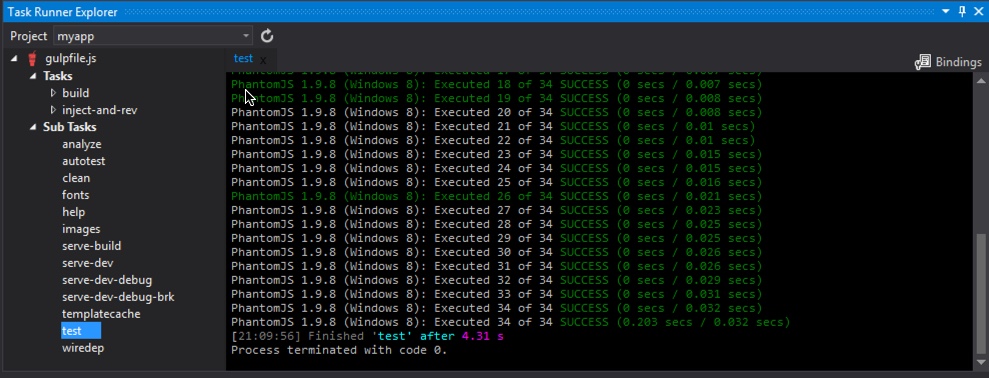
Now you’ll see the Task Runner Explorer (TRX) showing list of tasks that are contained within the gulpfile.js. You can run those tasks by double clicking them. Try this by double clicking the test task. This runs the unit tests for the project and displays them in the output window in the TRX.
This works on agulpfile.jsorgruntfile.js, so you can choose either Grunt or Gulp.
You can run other tasks here and in hook into bindings, which allow you to run tasks before or after builds (for example). Right click on the analyze task and select Bindings and then Before Build. Then repeat that for the test task. This will run the analyze and build tasks before you build your project in Visual Studio.
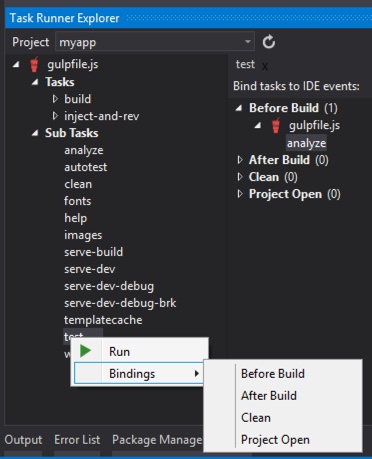
Why is this cool? Because now you can perform code analysis on your JavaScript and run your unit tests before every build of your .NET code, automatically.
Now install the Visual Studio Package Intellisense extension so we can get some intellisense for our bower and npm packages.
Now open the bower.json and scroll to look at the dependencies list. This shows the client packages that HotTowel requires. Let’s say you want to add accessibility support to the Angular app so you decide to include the Angular ARIA module. You can do that by typing bower install angular-aria --save from the command line. The --save flag will add it to the dependencies list in bower.json. Or you can simply type in the bower.json file and use intellisense to find the package you want. You get intellisense for the package name and for the version!
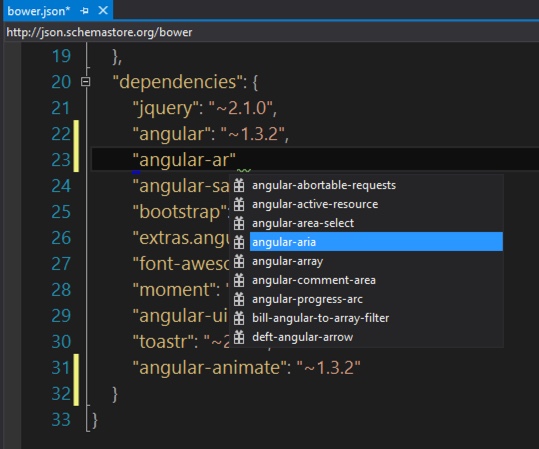
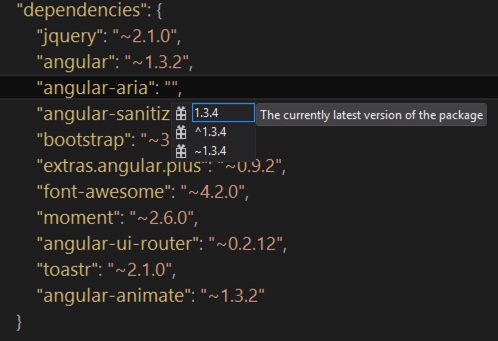
This is pretty powerful because often you may not know the exact name of the package you want. Does it have a dash or a dot in its name? Now you have an easy way of finding out and avoiding typos. This also works with npm packages in the new Visual Studio tooling.
You can remove the angular-aria package now
Now let’s run the app form Visual Studio by double clicking the task serve-dev and then opening the browser and navigating to http://localhost:8001.
Currently, I do not see a way to pass arguments and flags into the tasks via the TRX, which is why you had to open the browser yourself. I imagine this is coming in a future version or patch.
There is More Room to Grow for Visual Studio
I have to believe there is a lot more coming to Visual Studio as they have just begun to tap the node related features. I expect these should include karma (a test runner) and yeoman (generators) and also expand the existing features of bower, npm, gulp and grunt. I’m sure there are ways I’m not even thinking that they’ll tap into, too.
Summary
So was taking node for a spin worth it? Think about what you just did. You created a new app, optimized it, and ran it. You can then make changes in either server code or client code and it immediately updates in your browser. No IDE necessary!
You undoubtedly have a lot of questions. Feel free to leave them in the comments here. The point of this post is to demonstrate some of the possibilities of what you can do in a matter of seconds, quickly and efficiently using node, npm, bower, yo, and gulp.
I’ll be diving into more about these topics in future posts, including how to get up and running on a Mac with OSX, more on gulp and its related tools, and hottowel.


